Contents
- 0.1 Step-by-Step Guide to Installing a New Toilet
- 0.1.1 Materials Needed:
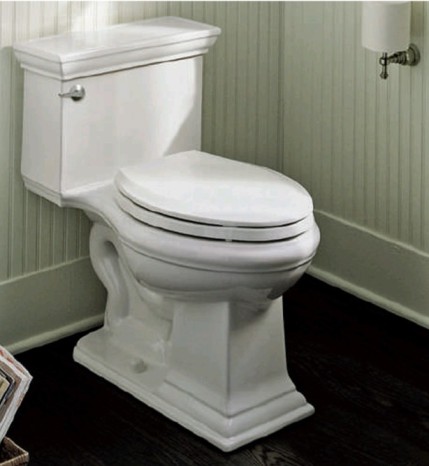
- 0.1.2 1. Choose Your New Toilet:
- 0.1.3 2. Prepare the Area:
- 0.1.4 3. Remove the Old Toilet:
- 0.1.5 4. Prepare for Installation:
- 0.1.6 5. Install the New Wax Ring:
- 0.1.7 6. Position and Install the New Toilet:
- 0.1.8 7. Secure the Toilet:
- 0.1.9 8. Connect the Water Supply:
- 0.1.10 9. Install the Toilet Seat:
- 0.1.11 10. Test the Toilet:
- 0.1.12 11. Finish Up:
- 0.2 Tips:
- 1 Author
Step-by-Step Guide to Installing a New Toilet
Materials Needed:
- Adjustable wrench
- Bucket and sponge
- Channel-type pliers
- Hacksaw (if needed)
- Penetrating oil (if needed)
- Pliers
- Putty knife
- Rubber gloves
- Screwdriver
- Supply tube
- Teflon tape
- Toilet seat bolts
- Toilet seat
- Towels
- Utility knife
- Wax ring without flange or with flange (depending on your toilet and flange type)
1. Choose Your New Toilet:
- Visit your local home center and select a high-efficiency toilet (HET) that meets your preferences and budget. Look for features such as wide passages and a 3″ flush valve for powerful, clog-free flushes.
2. Prepare the Area:
- Turn off the water supply to the toilet. Flush the toilet to drain the tank and bowl. Use a sponge to remove any remaining water from the tank and bowl.
3. Remove the Old Toilet:
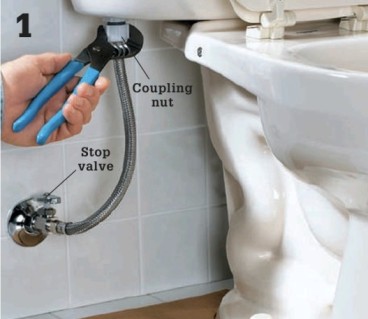
- Remove the old supply tube. First, turn off the water at the stop valve. Flush the toilet, holding the handle down for a long fl ush, and sponge out the tank. Unthread the coupling nut for the water supply below the tank using channel-type pliers. Use a wet/dry vac to clear any remaining water out of the tank and bowl.
- Remove the caps covering the bolts at the base of the toilet and use a wrench to loosen and remove the nuts.

- Grip each tank bolt nut with a box wrench or pliers and loosen it as you stabilize each tank bolt from inside the tank with a large slotted screwdriver. If the nuts are stuck, apply penetrating oil to the nut and let it sit before trying to remove them again. You may also cut the tank bolts between the tank and the bowl with an open-ended hacksaw. Remove and discard the tank.

- Remove the nuts that hold the bowl to the fl oor. First, pry off the bolt covers with a screwdriver. Use a socket wrench, locking pliers, or your channel-type pliers to loosen the nuts on the tank bolts. Apply penetrating oil and let it sit if the nuts are stuck, then take them off. As a last resort, cut the bolts off with a hacksaw by fi rst cutting down through one side of the nut. Tilt the toilet bowl over and remove it.

- Removing an old wax ring is one of the more disgusting jobs you’ll encounter in the plumbing universe (the one you see here is actually in relatively good condition). Work a stiff putty knife underneath the plastic fl ange of the ring (if you can) and start scraping. In many cases the wax ring will come off in chunks. Discard each chunk right away—they stick to everything. If you’re left with a lot of residue, scrub with mineral spirits. Once clean, stuff a rag in a bag in the drain opening to block sewer gas.
4. Prepare for Installation:
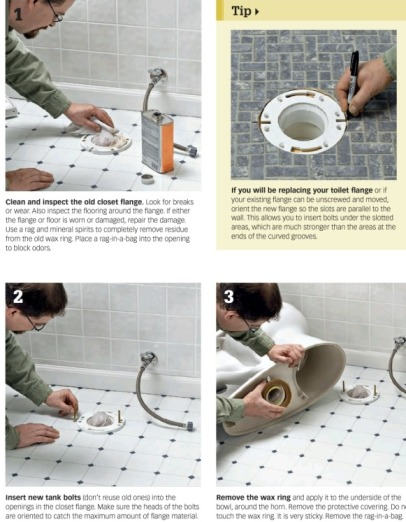
- Scrape off the old wax ring and any debris from the flange using a putty knife. Ensure the flange is clean and in good condition.
5. Install the New Wax Ring:
- Place the new wax ring onto the flange. If your toilet requires it, use a wax ring with a flange for a better seal.
6. Position and Install the New Toilet:
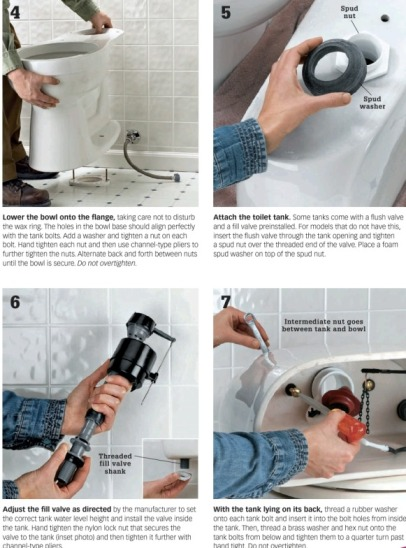
- Carefully lift the new toilet and align it with the bolts on the flange.
- Lower the toilet onto the bolts and press down firmly to set the wax ring.
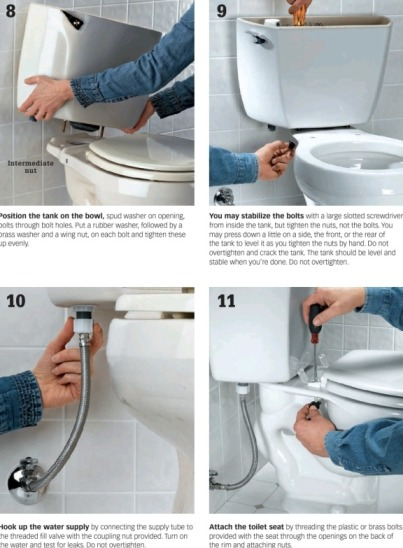
7. Secure the Toilet:
- Install washers and nuts onto the bolts. Tighten them evenly using a wrench. Be careful not to over-tighten as this could crack the porcelain.
8. Connect the Water Supply:
- Reconnect the water supply line to the toilet’s fill valve. Use Teflon tape on the threads for a secure connection.
9. Install the Toilet Seat:
- Follow the manufacturer’s instructions to install the toilet seat onto the bowl using the provided bolts.
10. Test the Toilet:
- Turn on the water supply and allow the tank to fill.
- Flush the toilet several times to check for leaks and to ensure proper flushing operation.
11. Finish Up:
- Use a utility knife to trim any excess wax from around the base of the toilet.
- Clean up the work area and dispose of the old toilet and packaging properly.
Tips:
- Ensure the toilet is level before tightening the bolts.
- Check all connections thoroughly for leaks after installation.
- Refer to the manufacturer’s instructions specific to your new toilet model.
By following these steps and tips, you should be able to successfully install a new, efficient toilet in just a few hours. Enjoy your upgraded bathroom with improved flushing performance and water efficiency!
Here are some well-known companies in the USA that provide Plumbing services
-
Roto-Rooter
- Website: Roto-Rooter
- Contact: You can find their local contact information on their website.
-
Mr. Rooter Plumbing
- Website: Mr. Rooter Plumbing
- Contact: Contact details can be found on their website for local services.
-
Benjamin Franklin Plumbing
- Website: Benjamin Franklin Plumbing
- Contact: Check their website for local contact information.
-
ARS/Rescue Rooter
- Website: ARS/Rescue Rooter
- Contact: Visit their website for local service contact details.
-
Rooter-Man
- Website: Rooter-Man
- Contact: Contact information for local services can be found on their website.


